
(UPDATED 2025-11-29)
When I originally created my "mymaps" map, I decided organization via layers was the way to go. Unfortunately, I soon hit the layer ceiling (which I believe is 10). Undoing this mistake has been a mindblowingly frustrating experience. I've wasted hours of my life trying to merge the layers using a variety of stupid and frustrating methods.
After about a decade of dealing with this nonsense, I finally realized how easy the solution is.
THE PROBLEM:
Google Mymaps has a layer limit of only about 10 layers, which you generally don't find out about until you arrive at the limit. You can manually move pins between layers in the Mymaps interface, but it's not suitable for moving more than one pin at a time and even then, you can't seem to move them "too quickly" or the whole site will crash and your work will be lost. When I tried to move the placemarks from one layer to another from within mymaps itself, I get about 5-10 moved before mymaps crashes. EVERY TIME. So I hit the error message > Reload link it generates and find that most of the pins I moved didn't get saved. It's a very tedious and buggy chore which should have been fixed or improved a decade or two ago.
Search results for this problem were all unnecessarily convoluted bullshit which didn't work. For example, I wasted a bunch of time with online tools that automatically merge KML's for you. But they all seem to lose the icon styles/colors and default everything to blue. It would take a LONG time just to redo all the individual placemark icons for anyone with a lot of pins on their maps. All of the automatic KML merger tools are dumb and useless and the people who made them need to be publicly depants'ed ASAP. Same goes for the people who designed mymaps to have a layer limit but no way for you to effectively deal with it. Why was it up to me to discover and to publish this information?! I hate everything, but I especially hate all the idiots who made all those online KML mergers which don't even work instead of just sharing how to do it yourself, not to mention those mymaps designers who caused this mess to begin with. A hex upon them all.
THE SOLUTION:
KML files are just XML files. And each layer is simply a "<folder>". Which means...
All you have to do is modify the code to move the placemarks to WHICHEVER LAYER(\FOLDER) YOU WANT THEM IN.
Depending on your ability to CTRL+F and search through XML code, this is EASY and takes mere SECONDS.
How To Merge Layers In Google Mymaps
Use the screenshot above as a visual reference.
Download your KML file. Make a copy of it to back it up because you're a dumbass who will probably overwrite the original by accident. I definitely never did that. Change the file extension to XML. Open it with Notepad++ (regular notepad/text editor works fine, but Notepad++ works better).
The top part of the XML file contains a bunch of (apparently useless) information. The important stuff starts with the first <Folder> tag. In my case, this is generally around line # 3593. Simply CTRL+F and search for <Folder>. That's your first layer. In the code, each layer is called a <folder>. The first <folder> tag should be just below the </StyleMap> tag. So your first pin will be the placemark tag just below the folder tag.
Locate your pins by their <Placemark> and </Placemark> tags. Each pin (aka placemark) looks like this (using the above screenshot as reference):
- <Placemark>
- <styleUrl>#icon-503-FF8277</styleUrl>
- <name>Pinned Location Name</name>
- <ExtendedData>
- </ExtendedData>
- <description><![CDATA[Pinned Location Description]]></description>
- <Point>
- <coordinates>-420,69</coordinates>
- </Point>
- </Placemark>
In order to move a pin in mymaps, simply find its <Placemark> and </Placemark> tags which contain the pin data. Each pin consists of a section of code like this. You will select everything from and including the <Placemark> and </Placemark> tags. Make another backup of your map file just in case. Cut and paste them to the layer (aka <folder>) of your choice.
SO EASY.
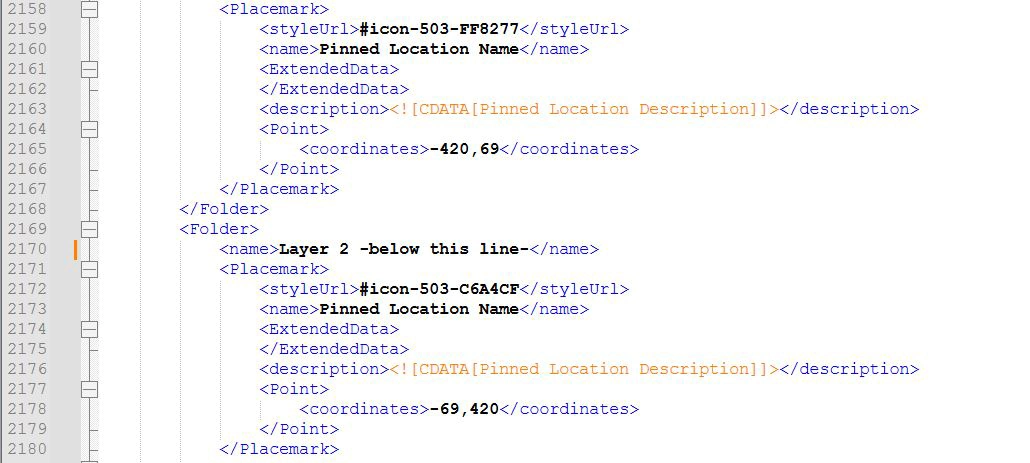
In order to remove a layer (and merge its data with the above layer), simply DELETE the three adjacent tags which define the layer and its name: The "</Folder>, <Folder> and <name>Layer 2 - below this line-</name>" tags. Highlighted in red below. Note that the <name> tags are what define the name of the layer (aka folder) so delete each name along with every pair of folder tags otherwise layer names could get all mixed up.
- <Placemark>
- <styleUrl>#icon-503-FF8277</styleUrl>
- <name>Pinned Location Name</name>
- <ExtendedData>
- </ExtendedData>
- <description><![CDATA[Pinned Location Description]]></description>
- <Point>
- <coordinates>-420,69</coordinates>
- </Point>
- </Placemark>
- </Folder>
- <Folder>
- <name>Layer 2 - below this line-</name>
- <Placemark>
- <styleUrl>#icon-503-C6A4CF</styleUrl>
- <name>Pinned Location Name</name>
- <ExtendedData>
- </ExtendedData>
- <description><![CDATA[Pinned Location Description]]></description>
- <Point>
- <coordinates>-69,420</coordinates>
- </Point>
- </Placemark>
Note 2: Every pin from your map is a <Placemark> in the code. The code is read top to bottom, so upon performing the above operation of deleting the folder tags, every placemark below this point would be joined into the preceding layer (aka folder). Referring to the above example in which the layer named "Layer 2 - below this line" is being removed: all placemarks down to the next </Folder> tag will subsequently end up in "Layer 1" (or whatever the preceding layer was named).
When you're done, just save the file as a .KML (with a new name so as to not overwrite the original) and test/verify.
By doing this, you also RETAIN ALL of your icons/colors/etc.
I have NO IDEA why this information wasn't posted elsewhere on the internet, or why all the online mergers/etc that I've tried totally erase all the icon/color settings when it's this EASY to do it correctly and RETAIN ALL ICONS AND COLORS.
Organic Maps is what Google's Mymaps should have been
If you're this deep into maps, you should know that Organic Maps is what Mymaps should have been. It works offline, it's compatible with KML's and you can download maps for a given area. I am not affiliated, just a fan.


